
How to Control Addressable LED Strips


Addressable LED strips are arguably the most dynamic LED strip lighting solution. They have a unique design that allows you to control individual LEDs or specific channels of LEDs to create multiple effects. You can change colors, adjust brightness, and control the timing of various effects.
This thus brings us to the question: how do you control addressable LED strips to create such dynamic effects? Further, are there addressable LED controllers? How do they work?
Let’s examine these important issues, shall we?
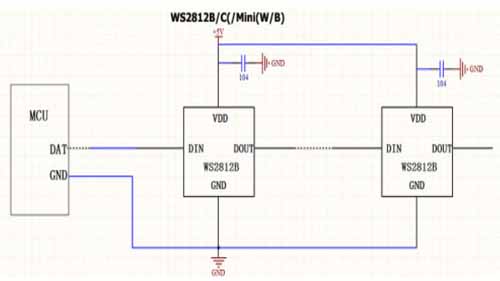
An addressable LED strip is made of a series of interconnected LEDs. Each LED has 2 chips:
A LED Chip – a semi-conductor component that illuminates when current passes through it.
An integrated circuit chip (IC) – a digital component that receives, decodes, and transmits data signals from addressable LED strip controllers
These parts are joined by conductor pins to form a circuit. The VDD pin delivers power supply and is grounded by the VSS. On the other hand, the data input (DIN) and data output (DO) pins are only for receiving data signals from the controller. Both DIN and DO are connected to the integrated circuit chip.
So, do all these components work together? The series of operations unfold as follows.
The power supply is turned on and current flows through the circuit through the VSS and VDD pins.
The LED chips become illuminated as the current flows.
When a command is put in on the controller, it is received by the data input pin which relays it to the Integrated Circuit chip.
The IC decodes the command for that particular individual LED. It then transmits the data signal to the next LED through the data output pin.
The cycle is repeated in sequence until the end of the strip.
Arduino is an open-source electronic prototyping device. It has a physical circuit board and software that can be run on a computer to program the physical board. It is this programmability function that allows for it to be used as an addressable LED strip controller. However, to use Arduino as a control device you need to ensure that your addressable LED strip is compatible with it.
To control an addressable LED strip using Arduino, you will need to install a library. A library is a software that is designed for inputting commands on the physical board of the Arduino which relays them to the addressable LED strip. There are many libraries that you can choose from and some are even free. The difference is that some are compatible with a wider variety of addressable LED strips than others.
Libraries often come in ZIP format. You will need to extract your library and save it in the libraries folder of the Arduino to begin using it. Additionally, you will need to define the parameters of your LED strip set up before you can begin entering commands using the software. This definition is what will enable you to choose which channels of LEDs to control.
Smart wireless addressable LED controllers are ideal if you would prefer not to go through the hustles of coding software. They have a mini-controller that is connected to the addressable LED strip and a remote control device. Any smart device can also be paired to the micro-controller via wifi or Bluetooth and used as a controller. This would, however, require a smart lighting application to be installed on the smart device.
A smart wireless controller works as below:
A command is entered on the remote control.
It is relayed to the micro-controller connected to the addressable LED strip light.
The micro-controller further relays the data signal of the command through the data input pin of the LED strip.
This type of controller gives you a lot more freedom and is more user friendly. You can remotely operate your strip lights from a distance as far as 20 meters and the range of effects you can implement is quite vast.
In an RGB LED configuration, both types of controllers allow you to select different colors and levels of brightness for individual LED channels. You can achieve over 16 million colors and about 255 different levels of brightness.
In HSV mode, you can manipulate the lighting by adjusting the hue, saturation, or value settings. Hue represents an original color and all the shades in its spectrum. Saturation is a measure of how light or dark the shade of the color is. A saturation of 0 will yield white light but the shade gets darker as saturation increases. Lastly, the ‘value’ control function allows you to adjust brightness as needed.
With the right set up, controlling addressable LED strips is extremely easy. Plus, as you get more accustomed to your chosen addressable LED controller, you could begin to explore more complex effects. For best results always use authentic merchandise and consult your addressable LED strip manufacturer on which controllers work best with their products.

